We use cookies to make your experience better. Read more
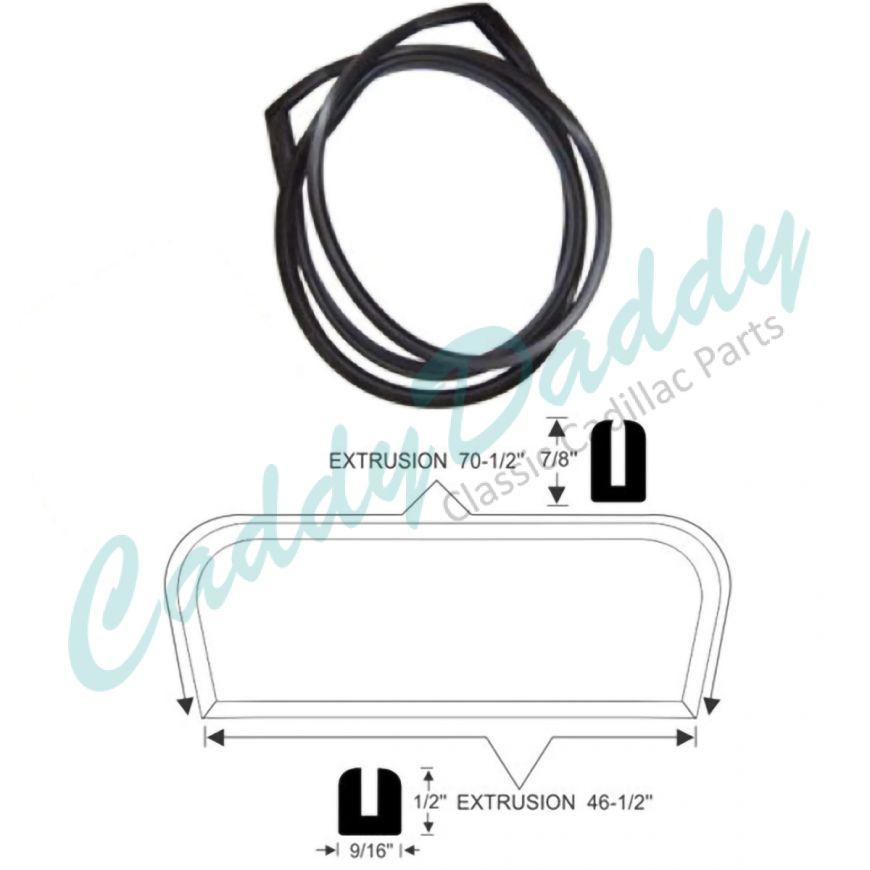
1936 1937 Cadillac (See Details) Windshield Rubber Weatherstrip REPRODUCTION Free Shipping In The USA
$209.00
SKU
70-0994-50
REPRODUCTION
Free Shipping In The USA

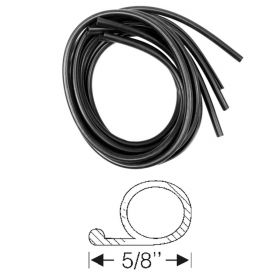
REPRODUCTION. This is a windshield rubber weatherstrip that mounts around the full perimeter of the front glass and has properly molded corners for a precise, factory fit. May also need divider bar seal #70-0486-51.
FITS:
1936-1937 Cadillac Series 70 Convertible, Series 75 4-Door Convertible And Town Sedan Models ONLY
The following general instructions are to be used only as a guide. For more specific instructions, refer to your vehicle body service manual.
Quality Restoration Rubber Parts
Removal tips
Cut
Inside
Outside
Molding
Pinchweld A
Cut inner lip off of weatherstrip above the pinchweld (diagram A). Slide a flat teflon knife or spatula between the rubber and glass and the body to release the rubber from the glass and the body. Carefully push glass from the inside upper corners and center, applying even pressure. Do not over push. If you do not feel it starting to give, then check the weatherstrip, both inner and outer, to make sure that it had released from the body and that it is clear of the pinchweld. It should remove easily.
Clean up body area of all putty and dirt. Make any repairs. If reusing the same glass, clean thoroughly around perimeter of glass.
Installation:
B
Lubricate the 1/4" glass groove with glass lubricant or very soapy water to allow the glass to find center while installing. Place new rubber on glass making sure that it is placed correctly and fits well. Any problems with fit will show up at this point. Rubber should fit glass without being too loose or too tight. Improper size will pucker or fold in corners. Place chrome strips in top and bottom slots of rubber first. Then position sides and lock in corners. Place 1/4" cotton cord in pinchweld slot of rubber around perimeter to help pull flap over pinchweld, as demonstrated in diagram B.
Place a bead of sealant from the bottom outer corner of the pinchweld, all around the opening. Position the glass with the weatherstrip on center and place the bottom so that it starts to lip over the pinchweld. Pull the cord slowly making sure that the lip is lapping over the pinchweld. At this point, it would be helpful to have a helper pushing down on the glass, to help it seat against the body. Pay particular attention to the bottom outside lip of the rubber so that it doesn't fold under. If it looks as though it might, then place a section of cord along the bottom underneath the lip. Once the inner cord is pulled along the bottom, then the outer cord can be pulled to properly position the outside lip.
Note: Cord should always start at lower center and be pulled evenly in both directions. Do not let glass get cocked in one direction, it will put pressure on curve of glass and cause breakage.
Once the bottom is in place, work up the sides, then top, while applying down pressure on the glass. When the top lip is pulled in over the pinchweld, the glass should drop in place. Check inner and outer perimeter to make sure that it is laying flat. Some areas such as the defrost vent areas, might need to have rubber pushed behind them. Once the rubber and glass is in place, put clear sealer between rubber and glass on outer side with flat blade applicator. Clean excess sealant.
Related Products